Introduction
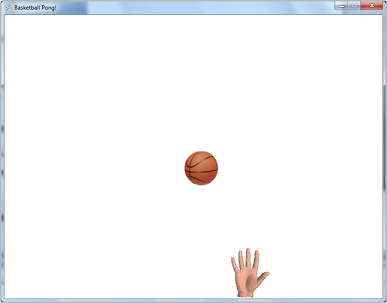
This tutorial will show you how to implement a simple Pong-like game for Windows using Microsoft XNA 4.0. The finished product will look like the image below. You will control the hand at the bottom of the screen using the left and right keys on your keyboard. The ball will move about the screen, bouncing off the sides of the window. The goal is to keep the ball from falling past your hand.
Prerequisites
Microsoft is no longer maintaining XNA, but you can still use it in a modern IDE like Visual Studio 2013. However, you will need to install a number things to get this to work:
- Install Visual Studio 2010. Any edition will work.
- Install XNA Game Studio 4.0
- Install XNA 4.0 Refresh for VS 2013. After you have downloaded the zip file, extract it and run XNA Game Studio 4.0.vsix
If you do not have access to Visual Studio 2010, you might try MonoGame. It does not have a content pipeline converter (software that converts content like sound files into xnb files) so you will not be able to use the .wav files used in this tutorial. All the code in this tutorial (minus SoundEffect code) will work fine in a MonoGame project.
Files Needed
Download each of these files to your hard drive. We will add these to our Visual Studio Project later. basketball.png
 hand.png
Create an XNA Project with Visual Studio
Although this tutorial shows screen shots from VS 2010, there is no big difference when using VS 2013.
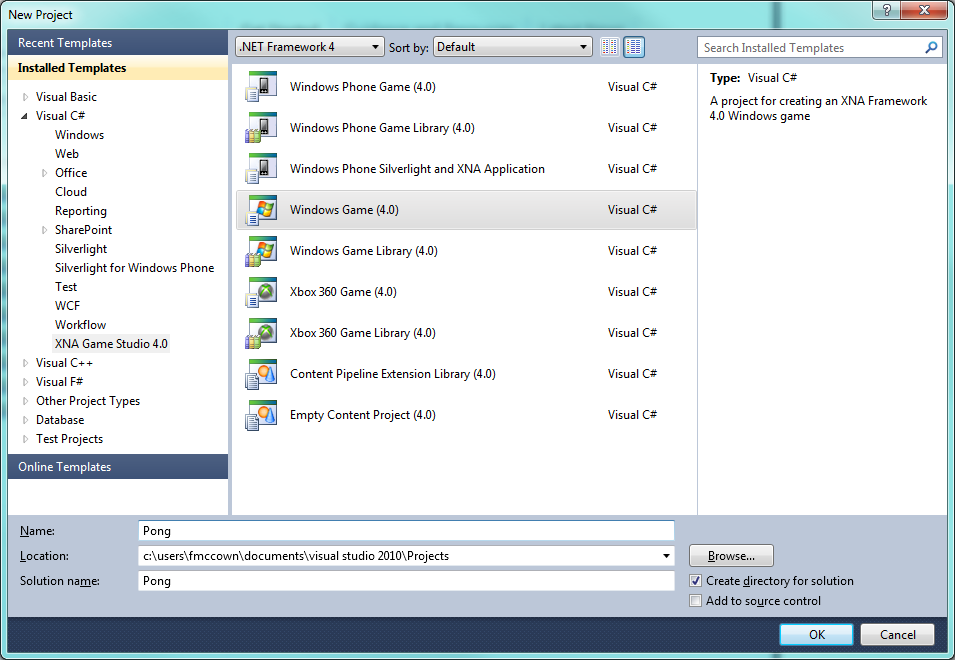
- Start Visual Studio 2010 or 2013. Select File -> New -> Project... from the menu.
- In the New Project dialog box, select Visual C# -> XNA Game Studio 4.0 and choose Windows Game (4.0).
Name your project Pong as shown in the screenshot below
and press OK.
- When the project is created, you will see Game1.cs loaded into the IDE which is populated with some basic XNA code. You could run the program as it currently stands, but it will only show a blue, empty window.
Add a Bouncing Ball
Let's first add a ball that will bounce off the walls. We'll start by adding the basketball.png file (one of the graphics you downloaded earlier) to your PongContent project. This project is used to hold all the images, sounds, etc. that are used in your game. Then we'll add the code to load the image and draw it.
-
Right-click on the PongContent project in your Solution Explorer.
Select Add -> Existing item... which will display an open file dialog box.
Locate the basketball.png image you downloaded to your hard drive and click
the Add button.
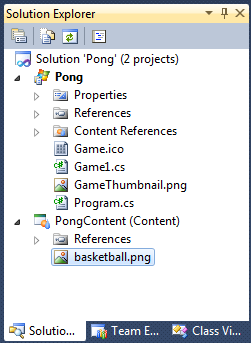
You should now see the basketball.png file added to the PongContent project in the
Solution Explorer as shown in the image below. The file has been be copied into
your project's directory.
If you click on the image file, you will see its properties in the Properties window as shown below. Note that the image is given an Asset Name called basketball. The asset name will be used later in the tutorial.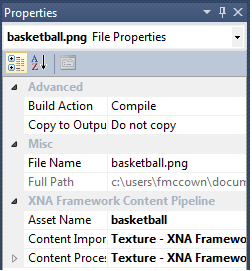
- In the Game1 class, declare the following class-level variables:
- ballSprite - holds the image used to display the ball
- ballPosition - the (x,y) location of the ball on the screen. Since we initialize it to the zero vector or (0,0), the ball will initially be positioned in the top-left corner of the window.
- ballSpeed - indicates the horizontal and vertical speed of the ball. Initializing it to (150, 150) means it will move 150 pixels a second in the x and y direction.
public class Game1 : Microsoft.Xna.Framework.Game
{
    GraphicsDeviceManager graphics;
    SpriteBatch spriteBatch;

    // Ball sprite
    Texture2D ballSprite;

	// Ball location
    Vector2 ballPosition = Vector2.Zero;

    // Store some information about the sprite's motion.
    Vector2 ballSpeed = new Vector2(150, 150);
-
In the LoadContent() method, load the basketball image into ballSprite. LoadContent() is called just once when your application begins, and this is where you will load all images and sounds that are used in your game.
protected override void LoadContent()
{
	// Create a new SpriteBatch, which can be used to draw textures.
	spriteBatch = new SpriteBatch(GraphicsDevice);

	ballSprite = Content.Load<Texture2D>("basketball");
}
Note that the call to Load() above uses basketball which is the image's asset name, not basketball.png which is the image's filename.
-
Finally, modify the Draw() method so it will display the ball
(ballSprite) on the screen at the ball's current position
(ballPosition). This function is called 60 times a second and is
used to re-draw all the game's sprites on the screen. Right now we only
have a single sprite to display.
protected override void Draw(GameTime gameTime)
{
	GraphicsDevice.Clear(Color.CornflowerBlue);

	// Draw the sprite
	spriteBatch.Begin();
	spriteBatch.Draw(ballSprite, ballPosition, Color.White);
	spriteBatch.End();

	base.Draw(gameTime);
}
-
Now build and run the program by pressing F5. You should see the ball
positioned in the upper-left corner of a cornflower-blue screen as pictured below.
Close the window before proceeding.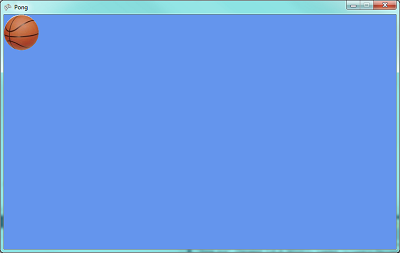
-
In order for the ball to move around the screen, you will next modify the Update() method. This function is called approximately 60 times a second, and it's used to modify the position of the sprites which are drawn on the screen in the Draw() method. This function is always called immediately before Draw() is called.
Remember that in the Draw() method, the ballPosition variable was used to position the ball in the window. Modify Update() so the ballPosition changes based on how much time has elapsed since the last time the Update() method was called. Since Update() is called approximately 60 times a second, we will multiply ballSpeed by 1/60. Since ballSpeed is initially 150, the ball will be moving approximately 150 * 1/60 = 2.5 pixels each time Update() is called.
We also need to ensure that the ball does not fly off the screen. The maxX and maxY variables will be the maximum values that the ball can travel in the x and y direction before needing to head back the other direction. A pair of if statements are used to check if the ball has traveled out of the window's bounds, and if so, to make the ball go in the opposite direction.
protected override void Update(GameTime gameTime)
{
	// Allows the game to exit
	if (GamePad.GetState(PlayerIndex.One).Buttons.Back == ButtonState.Pressed)
		this.Exit();

	// Move the sprite by speed, scaled by elapsed time
	ballPosition += ballSpeed * (float)gameTime.ElapsedGameTime.TotalSeconds;

	int maxX = GraphicsDevice.Viewport.Width - ballSprite.Width;
	int maxY = GraphicsDevice.Viewport.Height - ballSprite.Height;

	// Check for bounce
	if (ballPosition.X > maxX || ballPosition.X < 0)
		ballSpeed.X *= -1;
	if (ballPosition.Y > maxY || ballPosition.Y < 0)
		ballSpeed.Y *= -1;

	base.Update(gameTime);
}
-
Run the program again by pressing F5. You should see the ball
moving around the window, bouncing off the edges as pictured below.
Close the window before proceeding.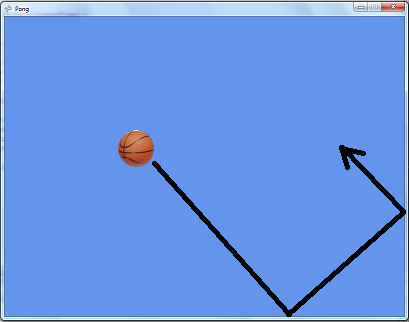
-
You may have noticed that your mouse disappears when you position it
on top of the XNA window. This can be confusing to your users, so
make it visible by setting IsMouseVisible in the
Initialize() method:
IsMouseVisible = true;
Add a Paddle
We will now add a paddle (the hand) which can be controlled by the left and right arrow keys on the keyboard.
-
Add the hand.png file to your PongContent project,
just as you added the basketball.png file earlier.
-
Add two class-level variables for the paddle's sprite and the paddle's (x,y)
position on the screen.
// Paddle sprite
Texture2D paddleSprite;

// Paddle location
Vector2 paddlePosition;
-
In the LoadContent() method, load the paddle's hand image, just as
you did the ball's image earlier.
paddleSprite = Content.Load<Texture2D>("hand");
-
In the Initialize() method, set paddlePosition so that the
paddle is at the bottom of the screen, centered horizontally as show
in the figure below. Some calculating is necessary since paddlePosition is the upper-left
corner of the paddle in screen coordinates.
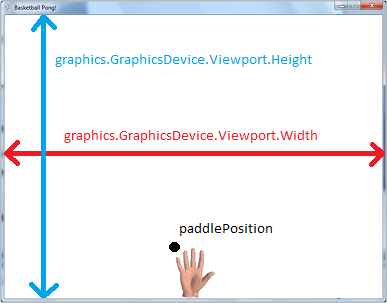
protected override void Initialize()
{
	base.Initialize();

	// Set the initial paddle location
	paddlePosition = new Vector2(
		graphics.GraphicsDevice.Viewport.Width / 2 - paddleSprite.Width / 2,
		graphics.GraphicsDevice.Viewport.Height - paddleSprite.Height);
}
Make sure base.Initialize() is called before accessing paddleSprite, or it will be null, and your program will crash!
-
In the Update() method, let's move the paddle left if the left arrow
key is pressed or right if the right arrow key is pressed. This requires us
to access the KeyboardState which can tell us if a key is up or down.
You can place this code before or after the code that updates the ball's
position since the code segments are not dependent on each other.
// Update the paddle's position
KeyboardState keyState = Keyboard.GetState();
if (keyState.IsKeyDown(Keys.Right))
	paddlePosition.X += 5;
else if (keyState.IsKeyDown(Keys.Left))
	paddlePosition.X -= 5;
-
Now add a call to spriteBatch.Draw() to display the paddleSprite.
This must be inside the Begin() and End() calls in the Draw() method.
spriteBatch.Draw(paddleSprite, paddlePosition, Color.White);
-
If you aren't a big fan of corn the cornflower-blue background,
change it to some other color like white (also in your Draw() method).
GraphicsDevice.Clear(Color.White);
-
Run the game by pressing F5. You will now have a bouncing ball with
a hand that moves left and right. However, the ball and the hand essentially
ignore each other since we have not yet added any logic to
make the hand bump the ball.
Close the window before proceeding.
Add Collision Detection
We will now add the logic needed to detect when the ball and the hand collide. We'll make the ball bounce off the hand, but if the ball makes it to the bottom of the screen before the hand touches it, we'll restart the hand at the top of the screen.
-
In the Update() method, let's change our logic that handles boundary
checking for the ball. If the ball's Y position is greater than maxY, then the
ball has hit the bottom of the screen (the hand missed!), so we'll reset the ball
at the top of the screen and with its original speed (we'll be increasing
the ball speed if the hand hits it in the next step).
// Check for bounce
if (ballPosition.X > maxX || ballPosition.X < 0)
	ballSpeed.X *= -1;

if (ballPosition.Y < 0)
	ballSpeed.Y *= -1;
else if (ballPosition.Y > maxY)
{
	// Ball hit the bottom of the screen, so reset ball
	ballPosition.Y = 0;
	ballSpeed.X = 150;
	ballSpeed.Y = 150;
}
-
Immediately after the ball bound check from the previous step
(in the Update() method), let's add
some logic to determine if the rectangular bounds around the ball or the
hand intersect. If they do, we'll increase the ball's speed in the X and Y
directions to make the game a little more challenging.
We'll also have to invert the Y direction so the ball moves back
up the screen.
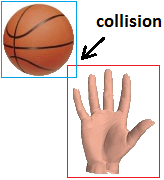
// Ball and paddle collide?  Check rectangle intersection between objects

Rectangle ballRect =
	new Rectangle((int)ballPosition.X, (int)ballPosition.Y,
	ballSprite.Width, ballSprite.Height);

Rectangle handRect =
	new Rectangle((int)paddlePosition.X, (int)paddlePosition.Y,
		paddleSprite.Width, paddleSprite.Height);

if (ballRect.Intersects(handRect))
{
	// Increase ball speed
	ballSpeed.Y += 50;
	if (ballSpeed.X < 0)
		ballSpeed.X -= 50;
	else
		ballSpeed.X += 50;

	// Send ball back up the screen
	ballSpeed.Y *= -1;
}
Note that rectangular bounds checking is not always the most ideal type of collision detection. If you examine the picture below, you'll see that with rectangular collision detection, the ball and hand sprites are intersecting, but there is actually a significant distance between the actual ball and hand.
Although rectuangular bounds checking may not always be ideal, it is the easiest to implement and the fastest to check. You can read more about 2D collision detection methods here.
-
Press F5 and varify that the collision detection is working. The ball should sail up when the hand hits it. If the ball hits the bottom of the window, it should immediately restart at the top of the window.
Also try hitting the ball with the side of the hand instead of the top. What happens? The ball seems to get "stuck" bouncing up and down very quickly because the collision detection keeps detecting an intersection which changes the direction of the ball up and down and up and down. This is probably not the behavior you want.
To fix this problem, we need to only execute our speed and direction-changing code once, and that's when the ball is on it's way down (ballSpeed.Y > 0). If the ball is on it's way up (ballSpeed.Y < 0), then we don't want to execute this code at all. Make the following fix to the rectange intersection if statement.
if (ballRect.Intersects(handRect) && ballSpeed.Y > 0)
Now re-run your program, and the ball should shoot back up if you hit it with the top of the hand or from the side.
Adding Sound
Our game could be a lot more fun to play with the addition of sound effects. Let's add a sound effect that plays when the hand hits the ball and another that plays when we miss the ball.
-
Add the swish.wav and crash.wav files to your PongContent project
in the same way you added the images earlier. XNA 4.0 supports .wav, .wma, and
.mp3 file types.
-
Add a couple of SoundEffect class-level variables to the Game1 class.
SoundEffect swishSound;
SoundEffect crashSound
-
In the LoadContent() method, load the .wav files.
swishSound = Content.Load<SoundEffect>("swish");
crashSound = Content.Load<SoundEffect>("crash");
-
When the ball and hand intersect, that's when we should play the
swish sound. Add a call to Play() inside the
if statement checking for collision.
if (ballRect.Intersects(handRect) && ballSpeed.Y > 0)
{
	swishSound.Play();
	...
}
-
Play the crash sound effect right before resetting the ball's
position and speed.
else if (ballPosition.Y > maxY)
{
	// Ball hit the bottom of the screen, so reset ball
	crashSound.Play();
	...
}
Improvements
If you've gone through this tutorial and can't get your program to work, or if you are in a time crunch and just want to examine the final product, you can download the complete solution in pong.zip.
There are a number of improvements we could make to this game. For example, we could keep track of the score or add a menu that can start a game. To be a true pong game, we should have two paddles (hands), not just one!
From a coding standpoint, it would be helpful to re-write the project so that it makes better use of object-oriented programming methodology. For example, the ball and the paddle logic should ideally be encapsulated into classes.
The XNA project in PongImproved.zip has a Paddle and Ball class. Unzip the project and load it into Visual Studio. The Paddle and Ball classes inherit from Microsoft.Xna.Framework.DrawableGameComponent which is a component that has its own Update() and Draw() methods so the ball and paddle can update their movements and draw themselves. The Game1 class only needs to declare and instantiate the objects and add them to the list of GameComponents so the objects' Update() and Draw() methods are called:
private Ball ball;
private Paddle paddle;

...

public Game1()
{
	graphics = new GraphicsDeviceManager(this);
	Content.RootDirectory = "Content";

	ball = new Ball(this);
	paddle = new Paddle(this);

	Components.Add(ball);
	Components.Add(paddle);
}
This simplifies how the ball and paddle collision detection is performed:
// Check for bounce
if (ball.X > maxX || ball.X < 0)
	ball.ChangeHorzDirection();

if (ball.Y < 0)
	ball.ChangeVertDirection();
else if (ball.Y > maxY)
{
	// Game over - reset ball
	crashSound.Play();
	ball.Reset();
}

// Collision?  Check rectangle intersection between ball and hand

if (ball.Boundary.Intersects(paddle.Boundary) && ball.SpeedY > 0)
{
	swishSound.Play();

	// Increase speed and go back up the screen
	ball.ChangeVertDirection();
	ball.SpeedUp();
}
The improved project also has some additional functionality:
- The ball pauses for a second before it starts moving to give the user a chance to setup.
- The paddle has better control over the direction of the ball (the ball doesn't pass through the hand).
- Pressing the F key will toggle the game between window and full-screen mode.
- Pressing the ESC key will quit the game.
Using this project as a starting point, see if you can make some enhacements (keeping track of the score, adding an opponent, etc.).

McCown's XNA Pong Tutorial by Frank McCown is licensed under a Creative Commons Attribution-NonCommercial-ShareAlike 3.0 Unported License.
| Home | Page last modified: |